
The next step to making your DIY NAS serve its purpose is to format and add those hard drives (HDD) to the system. You have them all plugged in the different SATA ports and so now it is time to make your operating system acknowledge them and make use of them. For this guide, I will only be going through the steps to format the HDD by itself and not make use of any RAIDs. RAID will be discussed in a later part. Once the drive is formatted and mounted, I will then go on to show you how you can set up your Samba File Server to start serving up those files to your network. Read on to continue the guide. All of this might be a tedious job to execute, especially with HDDs, which are delicate pieces of technologies. Such hindrances have led the storage industry into developing a new game changer: Hybrid Cloud Architecture: What Is It and Why Should You Care.
Partitioning, Formatting and Mounting of Hard Drive
First thing first, you will have to format the drives that you have hooked up to the system. The way you want to partition it is ultimately up to you but for the ease of explanation I will simply format and partition the HDD into just one partition. The drives will be formatted to ext4 and the reason why I’ve chosen such a file system is mainly due to the fact that it has the best balance between stability as well as performance. You can google up the different file formats and read the different advantages and disadvantages. In fact, you can format it to whichever file format that you are more comfortable with.
We will now have to find out what drives we have and what their drive letters are. The first command you want to type is:
sudo fdisk –l
Now take note which is your system HDD, it should already be formatted and partition as seen (yours may vary should you decide to partition it in a different way at the start):
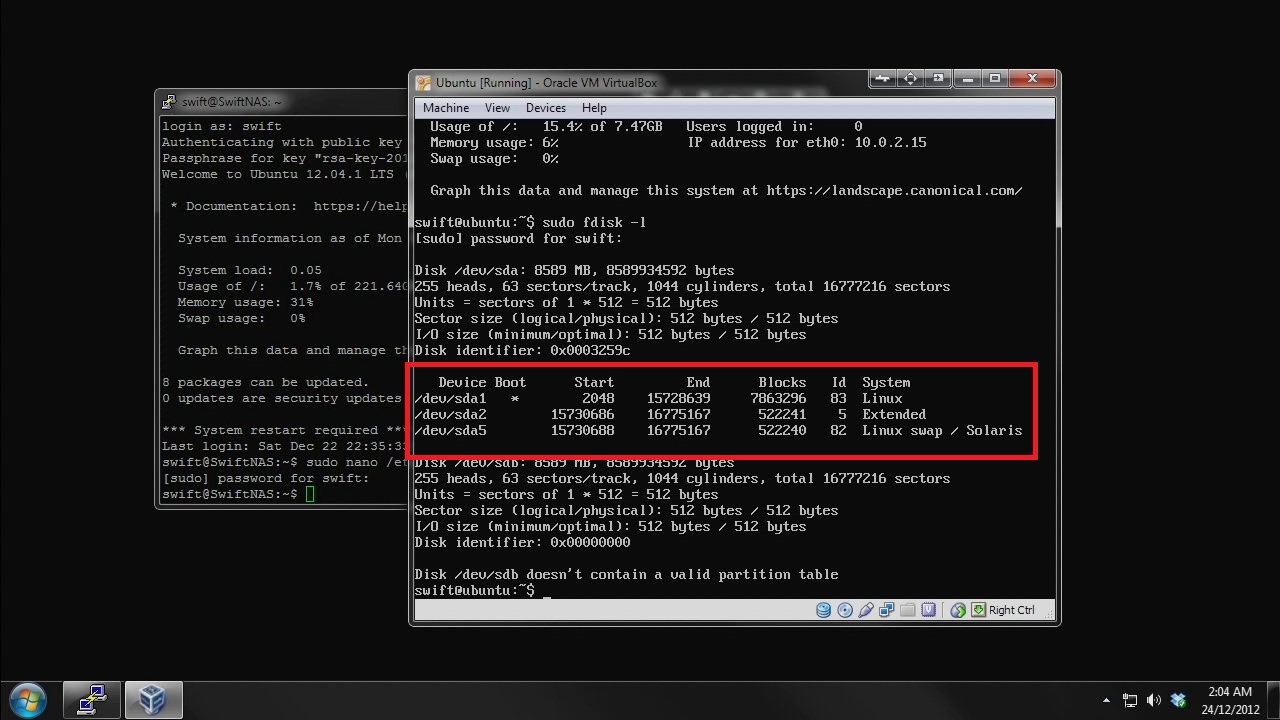
Taking note of the drive letter of your HDD (/dev/sd* where * is the letter of your HDD. For this guide the HDD is sdb) you will want to continue to format it using the utility fdisk (if your HDD is larger than 3TB you will have to use the utility gdisk instead):
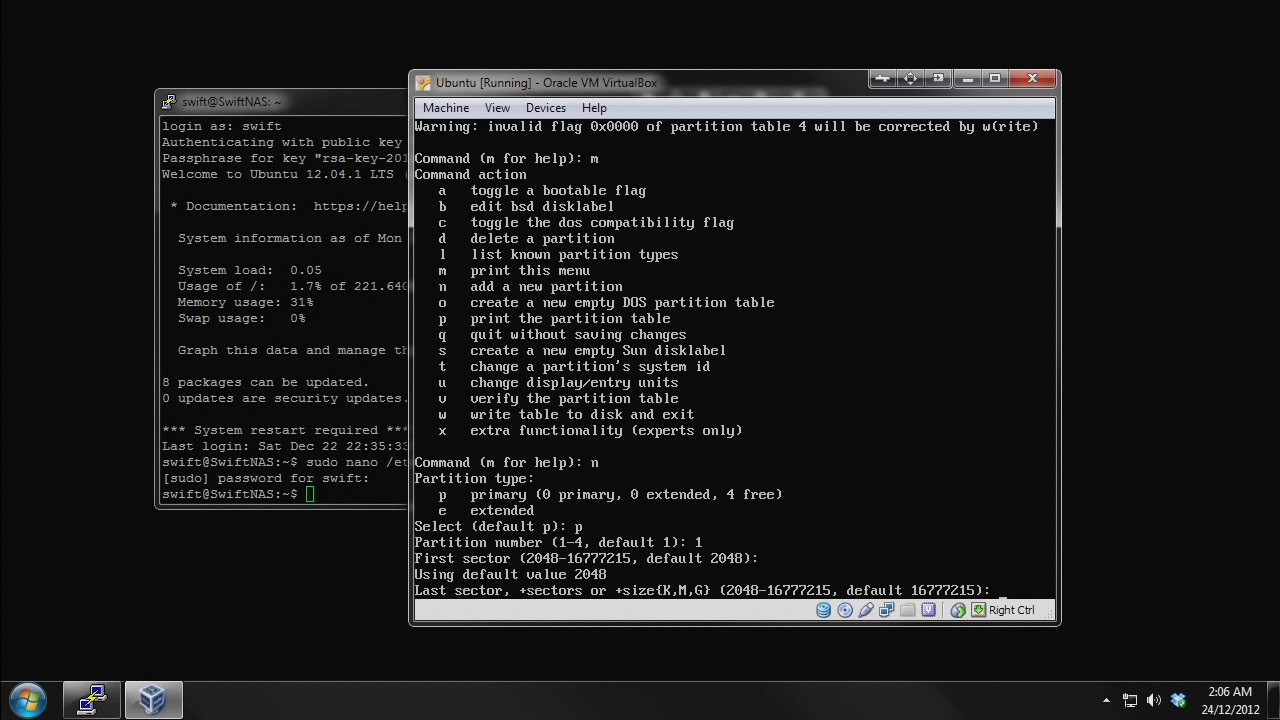
sudo fdisk /dev/sdb
Next to start partition and formatting your drives you will type “n†and press enter. You will then see the choices you can make and what you will want to do is to type “p†to create a primary partition. Since this is the only partition, type “1†and enter. Now it will ask you about the first cylinder, basically asking about the size of the partition. Simply hit “1†and enter as that will tell the system to use up everything on the HDD. Now that you have told the system what partition you want, you can now confirm your input and make it write the partition table by typing “w†and enter. It should tell you that the partition table has been altered.
You should now have a properly partitioned HDD and since its the first and only partition, it will be recognized as /dev/sdb1 by the system. (You can confirm this by listing your drives again) You will now want to format the partition to the file system that you want. To do this, type:
sudo mkfs –t ext4 /dev/sdb1
It should format the partition and the partition will soon be ready to be used. Â What you will need to do next is to mount the partition to a particular place. This mounting process is basically to tell your system where to access the drive. To do that you will want to create a new folder. You can do this anywhere but preferably under /media as it is the default location used by Ubuntu. You will want to make a directory by using the command:
sudo mkdir /media/drivename
With the directory created, you will now want to mount the drive. To make sure the system automatically mounts the drive every time it boots you will want to follow these steps:
First type “sudo blkidâ€. Find the UUID that matches your drive. For /dev/sdb the UUID is ҠNext enter the following command:
sudo nano /etc/fstab
Add the following line (replacing UUID with the actual UUID of your drive):
UUID /media/drivename ext4 defaults 0 2
Once done exit and save the file. You can reboot the system to see if the drive mounts or you can type “sudo mount –aâ€
Setting Up Samba File Server
First you will want to get the files for the Samba server and install it:
sudo apt-get install samba
Once done, we will now be editing the server settings to achieve a common shared storage among all approved users. For now, we will edit the Samba configuration file:
sudo nano /etc/samba/smb.conf
There are many different options and settings that you can adjust in the configuration file. You can read up more of the individual configurations on your own but as for now, I will simply guide you to getting the file server working. Head all the way down the file till the end and start typing the following:
[nas]

writeable = yes

path = /media/primary

force group = nas

valid users = @nas

create mode = 0664

directory mode = 0775
What this will do is identify the path as of which will become a network share as well as set it up such that all users under the group “nas†will be able to access and use it. This in a way creates a shared space for all approved users. All files created will also bear the group “nas†so as to allow all approved users to view the files. You can edit the settings respectively to suit your own needs.
Once done, save it and exit out. Now what you want to do is to “create†a samba user. Do note that Samba maintains its own user management outside of the operating system. You will thus have to add users into the Samba system aside from adding into Ubuntu. For example you already have a user “swift†created, you will still have to add the user again and define the samba password for the user by the command (the “-a†means create new user):
sudo smbpasswd –a swift
Enter the password you desire and then once you’re done, you have successfully created a samba login for yourself! All you will have to do now is to restart the samba server by typing:
sudo service smbd restart
Note: you will have to add your user (Ubuntu side) to whichever group that you have allowed in the configuration so for the example in this guide, you will have to add “swift†into the group “nasâ€. This can be done by typing:
sudo usermod –G nas swift
sudo usermod -a -G nas swift
You should have the group created before you start adding the users into it.
You can play around with the permissions and settings to create private spaces and folders for particular groups of people or individuals. For simplicity, I’ve simply created a shared storage space for all approved users to access and use.
There you go! The DIY NAS is all set up and ready to rock and roll.
Updated (21/10/13): Corrected command from “sudo usermod -G nas swift” to “sudo usermod -a -G nas swift”. This will prevent you overwritting any exisiting groups the user belongs to. The “-a” will modify the command into adding the new group rather than overwritting the existing groups. Thanks Willis Pilarte for pointing that out!


I have enjoyed your tutorials very much… even with the errors you made which you did not edit out. I still learned a whole lot, and for that I thank you.
Since you do not edit your videos I was happy to hear you constantly remind people to read up on the commands you use.
Suggestion:
1. If you post edit you can get more info in your video and less errors, unless you staged the error to show how to troublehshoot.
2. Put your disclaimer in a banner so as not to have to repeat yourself, hard to follow you sometimes.
3. the last command line I would change it
from:
sudo usermod –G nas swift
to:
sudo usermod -a –G nas swift
I had my machine setup and ready and lost sudo privellages and had to start over with the -a it will append and not remove you from any existing groups already established
Respectfully
BigWill
Thank you for the feedback and suggestions! Much appreciated.
As for some of your comments:
1. I wish I could say that I staged the error but nope, I do make some mistakes when recording and since it made more sense to me to rectify it on the spot, I didn’t restart the recording just to make it a perfect run through. Indeed this will make things a little harder to follow therefore I always encourage people to not just watch the video but also to read the written guide.
I always try my best to make it a perfect recording though. Things just always seem to pop up here and there. Oh well.
2. What disclaimer are you referring to?
3. Yeah that would be much better. The one I listed definitely would break some permissions should the user is already created and belongs to exisiting groups. I assumed that people would create a brand new user (following the flow of the guide) thus the command wouldn’t affect them. I will change that. Thanks for pointing out!
Thank you so much once again for all the feedback!