
Purchasing the different components and parts of the NAS requires some thinking and deliberation.  While all parts should work as long as they’re paired correctly (e.g socket 1156 motherboard with a socket 1156 cpu), some parts are “better†than others. When I say “better†I mean they are more value for money or if they serve a particular purpose more effectively. I’ve spent quite some time researching on the different parts available locally before coming to the decision which encompasses of the parts listed in this post.
(Skip right down the page for the video of the unboxing and assembly of the NAS)
There are a few factors that come into consideration when I’m making my decision. They are:
- Price and Value (Does the part worth such a price?)
- Reliability (Distributor, Support, Past Reviews)
- Compatibility & Features (Does it fit into the system and meets objectives?)
- Power Consumption (The NAS will be running 24/7)
- Upgradability (Can it be improved on in the future?)
- Availability (Many things are not sold here in Singapore)
With all that in mind, I’ve came up with the following list of components:
- Intel® Pentium® Processor G620
- Asrock H77M
- GSkill 4GB 1333MHz DDR3 x 2
- FSP300-60HCC
- NZXT Source 210 Elite
- Western Digital 3TB Green x 2
Total Price: Â Â Â Â Â Â Â Â $320 SGD w/o HDD ($730 w/ HDD)

CPU: Intel® Pentium® Processor G620
There are only a few low power CPUs for me to choose from. The main contenders are the i3 2120T, which costs twice as much as the G620 (and only a selected few shops hold it), and the AMD E350 which motherboard it comes integrated in lacks features and the price is way too high. I don’t really need the power of the i3 2000 series of processors thus opted for a cheaper and equally energy efficient G620. The power consumption when idling is almost identical and even if there is a difference of say ~5w, it will take at least 6.5 years before it breaks even.
Motherboard: Asrock H77M
I initially wanted the Asrock B75 Pro3-M but since the shop ran out of stock I went for the H77M instead. The main feature I looked out for when choosing a motherboard is the number of SATA ports that are present on the motherboard. The H77M has 4 SATA2 and 2 SATA3 ports with a total of 6 ports for me to use. I’ve wanted a motherboard that has an Intel NIC but the only ones that have it are way up in the price range. I’ve considered a mini-ITX board but the upgradability of such boards is very low. With the max of 6 SATA ports and an expandability of just 1 PCI-E slot, the board will become a bottleneck soon enough in the future. The main reason for getting a mini-ITX board is that the Mini-ITX cases that are available are very beautiful and space saving. The main problem though is the price. Beautiful they are but pricy they are too. As for other budget motherboards, the Asrock is the cheapest among them all and the warranty support here is pretty good.
RAM: GSkill 4GB 1333MHz DDR3 x 2
The cheapest rams that does the job well enough. Gotten 2 sticks of 4GB just because it doesn’t cost that much more and having more isn’t a bad thing.
Power Supply: FSP300-60HCC
The lowest powered PSU that is readily available. It is cheap and efficient. Does perform as an 80+ certified PSU and that should be good enough. There isn’t much to choose from really.
Case: NZXT Source 210 Elite
Cheapest case that has the ability to hold a total of 12 3.5†HDDs. It looks pretty decent as well. I’ve considered the Fractal Design R4 and many other quiet and feature-filled cases but they are simply too expensive considering that I will barely be seeing or hearing the NAS. The Source 210 has the ability to mount 120mm fans in the front which will effectively cool the HDDs. The bad thing though is the lack of filters. Need to see the dust situation in a month’s time to decide on the appropriate actions needed to be taken if any.
HDD: Western Digital 3TB Green x 2
Was contemplating the premium of the Western Digital Reds but for almost $50 more per drive, it is way too much for me to even consider. Wanted the Seagate 3TB drives but according to the shop the drives only have a year of warranty (which is stated otherwise in other shops, apparently my local distributor here is providing an additional 1 year). Hitachi 3TBs are nowhere to be found so I’ve finally settled on the WD 3TB Greens. Going to run them separately and only backup the important documents on the other drive. No plans for RAID or any of those sorts of things for now.
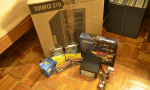
It is now time to assemble the different components to form the NAS! (Video contains quick unboxings of the different components as well as me talking about the parts briefly):
Next up, a quick comparison of the DIY NAS, which I named SwiftNAS and will refer the DIY NAS as that from now on, with Off The Shelf products. I will then follow with some installation stuff that I’ve gone through and update on the progress of it serving its ultimate purpose of a NAS.

One thought on “DIY NAS – Purchasing and Assembly”