Now that we have set up our basic firewall and port forwarded the necessary ports, we will now learn how to make use of that to enable data communication from outside the local area network (LAN). There are many protocols and ways to do this; SFTP is my chosen method and that is what you will be learning today.
There are several pros and cons to using different transfer methods. The most common one that you should know of is FTP (File Transfer Protocol). FTP transfer itself is very unsecure. Data that is transmitted is unencrypted and is extremely easy to intercept. This meant that should someone really want to enter your server for any reason, a simple tap into you communicating with the server will allow him to gain the information required to access the server. This brings us to a more secure method; FTPS (FTP Secure) is an extension to FTP, adding a layer of security in the form of SSL (Secure Sockets Layer) encryption and TLS (Transport Layer Security). It is FTP with encryption included. Another method you might think about is through Samba. Same thing as FTP, extremely unsecure connection and is not as well supported on non-Windows devices.
It all boils down to SFTP (SSH File Transfer Protocol) and FTPS. Why did I choose SFTP? SFTP provides encryption on all data communication between the client and server. SFTP is available should the server host a SSH server (no additional software or packages required). It uses the same port as the SSH server. On the other hand, FTPS will require you to open up more ports and additional packages will be installed. The sheer fact that SFTP is much more firewall friendly makes it the more welcomed solution. If you want to compare the different methods in greater depth, Google is a great source for information.
Now that you have understood why I am using SFTP, we shall get on to setting it up. Technically SFTP is already up since the day when you had the SSH server running. What we need to do now is to modify the configuration so as to make it suit our needs. To separate accounts that have SSH access and SFTP-only access, we will need to modify the current SSH configuration file. Before we do that, we will be creating a new group that identifies the users as purely “SFTP accountsâ€.
sudo groupadd sftpacc
Next, we will need to add users into the group. For this tutorial, we will be creating a new user account “tutorialâ€:
sudo useradd -d /home/sftp/tutorial -m -g sftpacc tutorial
-d specifies the home directory of the user
-m forces the creation of the directory
If you already have a user created and you want to add him into the group:
sudo usermod -g sftpacc user
You should be using SSH Key authentication (if you are not, set up a password for the user). If so, you will need to create a key pair for the user. Add the public key into the authorized key file within the user’s ssh directory (use PuTTYgen to generate your keys). e.g: /home/sftp/tutorial/.ssh/authorized_keys
Once done, open up your SSH server configuration file with the following command:
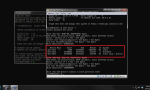
sudo nano /etc/ssh/sshd_config
Find the following line and comment it out:
Subsystem sftp /usr/libexec/openssh/sftp-server
Below it, add the following:
Subsystem sftp internal-sftp
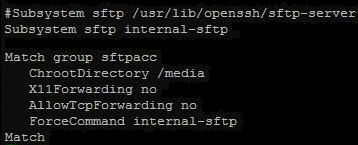
The final end state should look something like this:
#Subsystem sftp /usr/libexec/openssh/sftp-server

Subsystem sftp internal-sftp
Scroll all the way down the file and add the following (modify the group name and ChrootDirectory accordingly):
Match group sftpacc

ChrootDirectory /media

X11Forwarding no

AllowTcpForwarding no

ForceCommand internal-sftp

Match
The ChrootDirectory will be the directory the users will see once they first log in. In my purpose (NAS), I have the main storage directory as the root directory for the users. You can modify this to suit your own needs. If you want each user to be in their respective home folder, you can use the variable “%hâ€. What you need to ensure is that the root directory has the correct permissions, (owned by user and group root with chmod at 755). You will need to make a new folder within the user’s home directory with their ownership for them to transfer files.
Once you’re done, restart the SSH server:
sudo service ssh restart
To check that it is working, use a SFTP client to connect (I’m using Filezilla). Make sure you are able to read and write files. All that is left is to make sure you have your port forwarded.
With that you have a full fledge NAS working! You now have access to your data anywhere as long as you have an internet connection!