
Now that you have learnt how to enable global access to your server, you should prepare your server to be ready for the outside world. There are many different measures that you can take to prevent your server from being compromised. One of the more “straightforward†methods is to setup a firewall. This tutorial will show you and guide you to do just that.
If you’re hiding behind a home router or network of some sort you should more or less be covered. That’s partially what port forwarding is about anyways (opening ports on your WAN IP and forwarding them to your local services). Your router does have its own basic firewall and all ports are closed by default (unless you personally open them).
However, this does not mean that you can lax on the server’s very own security. Threats not only come from the outside but also from the inside, besides using internal security measures you also need to make sure to use the filtre de confidentialité MacBook system. Should one local network computer be compromised the rest will be in danger. It is thus very important to ensure that the server itself has some basic, yet effective, security measures put in place. More on cyber security you can learn at cyber security awareness training.
There are many ways to go about editing your firewall settings. With that said, I’ll teach you a seemingly “difficult†but most customizable and efficient way of setting it up.
Cyber security also needs to be effective in any area, it is recommended for a business to use a data room to maintain and keep the files, and documents secure and confidential from third parties, it is important to keep an update on virtual data room reviews to choose the right one for your business.
This is through the use of the tool called “iptablesâ€. Do ensure that you have all other semi-automated/automated firewall stuff removed. You might have something called “ufw†(uncomplicated firewall). Remove it by running the following command:
sudo apt-get remove ufw
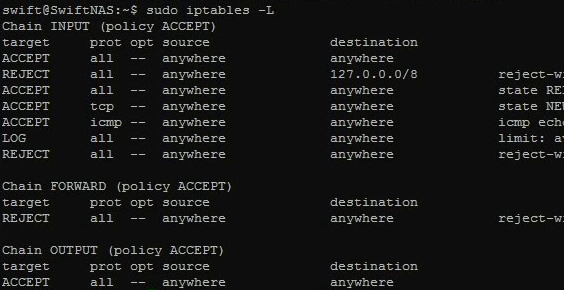
To see if you have any rules already implemented in your firewall, run the following command:
sudo iptables –L
This will list all current rules that are enforced within your system. It may or may not be filled. Anyways, lets not be bothered with that. By the end of this tutorial you should be having some rules set up and ready to go.
What we are going to do next is to create a file with all the rules that we need. Do so by typing:
sudo nano /etc/iptables.test.rules
This should be an empty file unless you followed some other guides/tutorials in the web that might use a similar method. Within this file, we will be loading it up with rules that we want our firewall to enforce. Here is a basic configuration you might want to start off with:
*filter

#  Allows all loopback (lo0) traffic and drop all traffic to 127/8 that doesn't use lo0
-A INPUT -i lo -j ACCEPT
-A INPUT -i lo -d 127.0.0.0/8 -j REJECT

#  Accepts all established inbound connections
-A INPUT -m state --state ESTABLISHED,RELATED -j ACCEPT

#  Allows all outbound traffic
#  You can modify this to only allow certain traffic
-A OUTPUT -j ACCEPT

#  Allows SSH connections
#
# THE -dport NUMBER IS THE SAME ONE YOU SET UP IN THE SSHD_CONFIG FILE
#
-A INPUT -p tcp -m state --state NEW --dport 22 -j ACCEPT

# Allow Samba server to work
# Uncomment only if you're using a Samba server!
# -A INPUT -p udp --dport 137 -j ACCEPT
# -A INPUT -p udp --dport 138 -j ACCEPT
# -A INPUT -p udp --dport 139 -j ACCEPT
# -A INPUT -p tcp --dport 139 -j ACCEPT
# -A INPUT -p tcp --dport 445 -j ACCEPT

# Allow ping
-A INPUT -p icmp -m icmp --icmp-type 8 -j ACCEPT

# log iptables denied calls
-A INPUT -m limit --limit 5/min -j LOG --log-prefix "iptables denied: " --log-level 7

# Reject all other inbound - default deny unless explicitly allowed policy
-A INPUT -j REJECT
-A FORWARD -j REJECT

COMMIT
The config is annotated, so hopefully you can roughly understand what each commands are for. To learn the full details as to what each variable means etc, I would suggest you reading up a more extensive iptables guide here: https://help.ubuntu.com/community/IptablesHowTo
So in the configuration above, we have denied any kind of access to any ports except the ones that we specified (mainly port 22 to allow SSH access and that is also the port that we will be using for file transfer in a later tutorial). We allow output of data on all the ports. It is a one way traffic system whereby things from inside can go out but things from outside will be filtered before they can come in. The first command also allows for internal looping and communication.
Once you’ve edited the file to your satisfaction (put in more commands should you have any other kind of services say a webserver etc), it is time to load it up to your server. To do so, use the following command:
sudo iptables-restore < /etc/iptables.test.rules
This will load up all the different commands that you have within the file that you have created. To see it in effect, repeat the command:
sudo iptables –L
This time the output result will be different. You should see all the rules that you want being set up in the firewall and are currently being enforced by the system. IMPORTANT: make sure you have your SSH port opened else you’ll be denied remote access. Now that everything is in place, we have to ensure that the rules stay in place even when the system reboots. There are a few methods to do this, the simplest is to use something called “iptables-persistantâ€:
sudo apt-get install iptables-persistent
Follow through the steps and say “yes†when it asks if you want to save the current ipv4 settings. To test if your rules are still in place when the server reboots, reboot the server and then check to see if the rules are still there:
sudo reboot
Followed by:
sudo iptables –L
In future should you make any changes to the rules, you must always remember to run the following command after you modified the rules to save it:
sudo bash -c "iptables-save > /etc/iptables.rulesâ€
(EDITED 20/02/2014) If you’re using iptables-persistent, you should save it to the iptables-persistent location instead (the file that it loads from):
sudo bash -c "iptables-save > /etc/iptables/rules.v4â€
That’s it! You have yourself a basic firewall all set up and ready to go!


2 thoughts on “DIY NAS – Basic Security: Firewall (iptables)”