
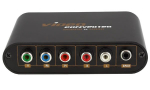
Previously in my review of Hauppauge Colossus, I mentioned about having a series of How Tos that revolve around using the colossus for recording footages etc. To start of this particular series, I will first be demonstrating the different possibilities of recording PC footage. Yes the colossus can capture your desktop display as well. It works like a screen capture software and if you’re using it to record gameplay footages, it works something like Fraps. Read on for the video or written guide.
[toc]
Some things are much easier to understand through visualization and verbal explanation. Here is the video that I’ve put up to explain how you can start recording your desktop footage. If there are any doubts or queries, do try reading this guide itself first as I might have explained a particular point clearer and more detailed here as compared to the video. However should you still have any questions, do feel free to leave a comment here or on the video page itself.
Hardware Setup
There are various ways of setting up your hardware in order to get this working. Firstly, make sure that the Colossus is installed properly into your system with the drivers being updated and the software Arcsoft ShowBiz being installed. With all that done, you will need an additional HDMI/mini HDMI to HDMI/DVI/DVI to HDMI cable. Why? We are basically going to make use of the HDMI input of the Colossus.
Video
Depending on the graphics card you have, the output options may differ. As such, do take a quick note of what output options you have. For example, you might have 2 DVI ports, 2 DVI and 1 mini-HDMI etc. Whichever spare output you have, grab a cable that has that particular head with HDMI at the other end (DVI to HDMI, mini HDMI to HDMI etc). Do note that on one graphics card you can output to at most 2 displays (the colossus counts as well) with exception of those professional models (Quadro etc).
Simply plug the cable with one end into the spare output of your graphics card and the other end into the HDMI input of the Colossus. With that done, it is time to play around with some settings of the graphics card and display. Understand that Colossus is recognized as a “monitor†or “displayâ€. Hence, you will configure it as if you are using it as a monitor. In order to record your desktop footage, you will have to simply go into your Nvidia/ATI/windows display control panel and configure it to duplicate your main monitor.
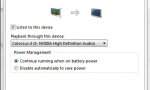
To make things easier and more generalized, you can simply go to your Control Panel and under Display under Change Display Settings/Adjust Resolution/Settings (see screenshot for reference), select the second monitor, which should be simply called “Display Device on:______†or whichever else that you have, and under “multiple display†select duplicate display (in my screenshots I have another monitor hooked up. My main monitor is numbered 1 and the colossus numbered 3 thus the correct option to select is duplicate desktop on 1 and 3. Choose accordingly). After all that is done, apply the new settings.


Once done, go to ShowBiz and in the Capture screen, under Video Input, select HDMI. You should be seeing whatever you are seeing on your desktop currently.
Audio
Audio input is going to be a little more interesting as compared to video input. There are various alternatives that you can go about to record audio from your desktop. I will be listing some of the more common and efficient ones (in my opinion). Before all of that, do keep in mind that the outputs of the Colossus are merely pass-throughs and are not in any way converters. This explains both why you cannot output any display and audio through the component output should you connect via HDMI input on the Colossus.
Please mute ShowBiz in your volume mixer to prevent a deafening looping sound. You will understand what I mean should you choose to proceed without doing so.
Graphics Card (HDMI Audio)
Both ATI and Nvidia cards support audio output via HDMI. The weird thing however, is that when connecting to the Colossus, you don’t actually have to use HDMI output from your graphics card in order to support such a feature. Yes I’ve tried using my DVI port to HDMI (Note: DVI doesn’t carry audio signals) and the following method still works. I’m thinking that instead of transferring the signals via the output ports, it carries it within the computer itself. Anyways it is pretty much going to your playback options in Windows and selecting HDMI Audio output as the default device.

Once you have that done, you will then have to go to ShowBiz and within the capture menu, under Audio Input, select HDMI.

If you’re using HDMI as an audio input for your recording, you cannot use the component output to output any audio. You may however (unconfirmed though highly possible. If anyone has tried it please do let me know. I lack the necessary equipment to test this), use optical audio out to output audio into another receiver. This is explained at the start.
An alternative to this is to use a HDMI splitter (most economical, DVI splitters cost much more). Thus, instead of using one dedicated output from your graphics card to your display monitor and one into Colossus, you use just one HDMI output and by splitting the signals, one goes into your monitor and the other into the Colossus. However, should you want to use your own speaker system which does not have optical audio input, you may consider the next method.
Onboard/Dedicated Sound Card (RCA Audio)
Most if not all of you will probably have a sound card in your system. It doesn’t really matter whether is it onboard or dedicated as all we are concerned with is the output of RCA stereo. There should be an output for front speakers (what you will normally use in a 2 speaker set up). What you will need or should already have is a 3.5mm to RCA stereo (if you don’t just get one, they are very cheap). What you will need to do is to simply plug from your sound card to the component input (just the red and white audio inputs) of the Colossus. Now for you to continue using your speakers, use the component output to connect from the Colossus into your speakers. In ShowBiz and within the capture menu, under Audio Input, select Line In (RCA).

Optical Audio
If your PC supports optical audio out, by all means use it to connect to the optical audio input of the Colossus. Set the Audio Input in ShowBiz accordingly. You can then use the optical audio pass-through to your sound system.
Software Setup (ArcSoft ShowBiz)
There isn’t much to setup in the software end but for the benefit of doubt I will be going through some settings that you can consider tweaking when capturing footage. This will mainly be focused on using the prebundled software ShowBiz by ArcSoft. I feel that it is sufficient enough for you to get your footages recorded. You can then import these footages into your different video editing softwares for post editing.
Video Format
There are 3 options for you to choose from: M2TS, TS or MP4. All of them work similarly well without much difference in quality when recording PC footage. It has come to my attention though that importing my recordings that were saved at M2TS or MP4 to Adobe Premiere resulted in the audio getting out of synced. It might just be my system that has such a problem due to the different codecs being set up and whatnots. You can try it out with your own video editing software to see which format performs the best. Other than that all the different formats will do well.
Format Settings
The most important settings you will want to play with are the video encoding settings. You have 2 different sliders: “Bit Rate†and “Peak Bit Rateâ€. The latter only matters should you be using variable bit rate mode. What these sliders do is basically allowing you to control the quality of your recordings. The higher the bit rate per unit time, the higher the quality. This will, however, lead to larger file size.

The next thing you will notice is the bit rate mode. You have two choices, either variable bit rate or constant bit rate. The former being one that encoding bit rate varies accordingly to the amount of detail that is present at the particular time. On the other hand, constant bit rate will mean that it will constantly encode at a particular bit rate regardless of whether of the actual amount of details that are present.
My recommendation as of now is to simply use the default settings. You can try increasing the “Bit Rate†and “Peak Bit Rate†to higher values for a higher quality recording. Between constant or variable bit rate it seem that the latter would be generally better for most people. Do note that if you are uploading to video sites do note how the site encodes your video as well. There is a so-called optimum encoding setting for each site. I will be doing a particular post that covers this aspect. I’ve done 2 different test recordings that can be viewed here (one for PS3 and for PC all default software settings):
http://www.youtube.com/watch?v=WcQ3AMHSTyY
http://www.youtube.com/watch?v=Y_q8V7cSFDI
Conclusion
This should be all there is to start recording your desktop and PC gaming footages. I will be doing an article comparing the different alternatives to record PC footage (mainly comparing with Fraps). Other than that, if you have any other questions or suggestions on what else should I cover, do feel free to leave a comment here or on the youtube page. Happy recording!


Good guide! Very helpful.
But I’ve got one question. How do I mute the colossus in the Volume mixer under Windows XP ? The card doesn’t exist in the mixer …
Unfortunately there is no easy way (from a short google search) to do it. There are some softwares that might be able to help but most of them requires you to pay. Do also be catious if you’re going to use them. Else maybe its time for an upgrade?
Very informative, i realize that there is an alternate option ” the one you describe ” other than my using my video card, video output, the auxiliary 1414 card input, the ten pin molex, has a possibility also. However, i like your straight forward approach of using a mini HDMI, output to the HDMI input on the card, so obvious, ” i missed it “, i am getting my proper pined cable tomorrow ,,, 🙂 thanks, good video, and very good write up. i think i am going to be very happy tomorrow, Cheers. thank you, Thomas Gx, in Vancouver metro.
i spend my hours and days, doing installation drawings, and how to do sequences. ” and i overlooked the obvious ” the mini HDMI output, is an excellent source of video display input to the Colossus. i was so focused on a mid-tier video car ” output ” a RCA video output. Going to the better video card, made things so much straight forward ” as you describe “
Glad that the guide has helped!