
I have already written a guide covering the topic on using the Colossus to record your PC footage. This time around, I will be sharing with you how to record your PS3 (or any other game consoles, apply accordingly) footage. It is fairly straightforward but there are still some things that you will have to take note of. Again if you don’t like reading, I’ve made a video that show you the different steps to get your recording up and running. Read on for the written and video guide.
[toc]
Video Guide
Hardware Setup
There is only one way to connect your PS3 to the Colossus and that is by using Component output. Do note that Component and Composite output is different. You will be required to get the PS3 Component cables (official or 3rd party, both works fine). It looks something like this:

HDMI will not work because the PS3 only outputs encrypted HDMI signals which the Colossus cannot read and record. Do not worry about the quality difference between Component and HDMI output because there isn’t any that is noticeable to the naked eye. This worry is even more redundant especially when you are going to encode the video and compress it by quite a bit when uploading online. Simply connect the component cables to the input breakout cables of the Colossus (matching the colors accordingly. Take note of which belongs to the audio left and right, colors are repeated but they carry different signals).
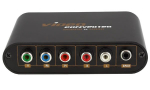
Once you have it connected, you are theoretically able to start recording your PS3 footage. However, you will not be able to play your game smoothly at all because of the delay present in the display of the recording software (Arcsoft Showbiz). You will be required to use the output breakout cables and with the AV passthrough feature of the Colossus, output the audio and video to your display. Now if you’re using a PC monitor you will most likely face the problem of not having Component inputs (not a problem if you’re using a TV). You will be required to get a Component to HDMI converter. It looks something like this:

Using the converter HDMI out, connect to your display. Do note that if you are using a cheap converter there might be a significant decrease in video quality that is being displayed. Do not worry though as this does not affect your recording quality at all. Once you got everything connected, you are ready to set up your PS3.
PS3 Setup
With your PS3 already connected to the Colossus and turned off, power up your playstation by holding on to the physical power button till you hear a beep. Soon after, you should be greeted with the starting screen. The thing about holding on to the physical power button is that this will reset whatever display and audio settings you had before and will detect whatever that is currently connected to your PS3 (in this case the component output). Log into any user and navigate yourself to Settings and then Display Settings.

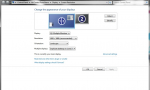
Choose Video Output Settings to set your display.

Select Component (Component and not Composite)

Select all the resolutions EXCEPT 1080p.

Confirm that you can see the display.

Set your audio settings and you’re done!
Conclusion
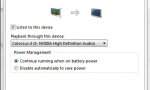
That is basically it. All you have to do is to select the video input as Component (YPbPr) and audio to whichever you are using and you should be able to see your PS3 footage being displayed. Do note however that there is significant delay in the capture screen of the software. You will have to use the AV passthrough and view the PS3 display directly if you want to play your game smoothly. Other than that, your recording should be up and running!


One thought on “Hauppauge Colossus: How To Record PS3 Footage”