After learning how to record your PC footage, we will now touch on the topic of recording live commentary. Recording commentary is simple. Get whatever footage recorded first and then record your commentary. You will then place your commentary over the audio of your footage using whatever software that you are comfortable with. Live commentary can be as simple. However, it will require a bit more tweaking and additional tools over a normal commentary. Read on for some viable methods for recording live commentary.
[toc]
Introduction
There are two main ways of getting your live commentary recorded. One is with an additional software/tool, the other is simply tweaking some settings within Windows and then using the Colossus to record. Both methods are relatively simple to implement; the former being a bit more tedious during the editing stage while the latter being more tedious before your start recording. Anyhow, each has its own disadvantages and advantages and I will be discussing them below in a bit more depth. Choose whichever you feel more comfortable working with.
For whichever method you choose to follow, you will need a microphone. Well that may be self-explanatory but you never know. It can be a dedicated mic, a headset mic or whatever. It will all work as long as you can use it to record your voice and input it into the computer. From here on you can watch my video or read my written guide.
Recording With Additional Software
For this method, you will have to sync the audio (commentary) during video editing. You will have two dedicated sound tracks, one for the commentary and the other for your PC footage. The crucial part to enable a near perfect sync (nothing is perfect) is the preparation or initiation (whatever you want to call it) stage. It is the time when you basically try to give an indication of where the commentary starts with respect to the footage that you are recording. I will go more into that later. For now here is a software that I recommend you can use to record your commentary.
Audacity
This is a free software that is versatile enough for all your recording needs. It is simple to use and you can use it both for your recording as well as some minor editing. You may choose to use your other video editing softwares for example Sony Vegas for recording but I don’t recommend those simply because they do tax your system a bit more than that of Audacity.
Before you start recording, ensure that you have your settings for recording done properly. Simply go to Edit > Preferences (or simply press Ctrl + P) and under “Devices†you have your microphone input as your device under “Recordingâ€. Once that is done, simply head back to the main screen and do a simply test recording (press the button with the big red dot) to see if input from your mic is being received and recorded. Once it is working, you are ready to start your live commentary.

Audacity Official Site: http://audacity.sourceforge.net/
Audio Syncing (How To)
You will want to have both Audacity and Showbiz open for recording. You will then start recording on your Showbiz first then Audacity (it doesn’t really matter the order of which you press record first). Now, before you begin your gameplay or whatever you want to do, you will give some kind of cue and indication that this is where the audio is supposed to be in synced. There are many ways of doing this, here is an example that you may consider:
Open up notepad or wordpad (or whatever note taking software). Before typing, you are going to say whatever letter you are going to type. Say it out and press that letter simultaneously. Basically you will go “A†and you type in the letter A, “B†and you type in the letter “B†and go on doing the same thing for a few seconds. Once that is done, you can now go into doing whatever you plan on recording.
This initial part will obviously be edited out of your final video. What this does is simply to allow you to sync the audio of your live commentary with the PC footage that you have recorded. Simply drag and slowly adjust it so that during playback it syncs in the way that when you say “A†the letter A is displayed. Note that during this initial stage you will want this to go on for a few seconds, hopefully typing a few other letters along the way. This will allow you to double check and achieve the best sync possible.
Why and Why Not This Method?
The main advantage of using such a method is the two dedicated audio tracks. This will allow you to play around with the sound levels of each track to achieve something that you like. It will also allow you to edit the individual tracks to remove any unwanted noise or whatever.
The main disadvantage however is, as you can most probably guess by now, the audio syncing. There is no way to get a perfect sync but by practising and getting enough experience recording you should be able to get a sync that is near perfect, at least to the listening ear. Don’t be afraid to try a few test runs first to see if it works out well. Another minor disadvantage is the additional stress on your CPU and HDD due to the additional software to record your microphone input. This additional stress and workload can be insignificant with most of today’s average systems so don’t worry too much on that. The bottleneck will most probably lie on your HDD rather than your CPU anyways. So if you’re afraid of such a thing of happening, do make sure you are saving your audio and video on a separate HDD and Raid 0 it if possible.
If you have any problem or unsure about what I mean about giving an indication or cue, do look at my video guide as it will allow you to visualize whatever you read here.
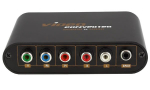
Recording With Just the Colossus
This method will allow you to record both your live commentary and the audio from your footage with the Colossus. This will require you to do some experimenting to get the best sound level ratio between your commentary and the footage audio. You may also face some difficulties due to system incompatibilities but it should work for most people.
System Setup
I am currently using an Nvidia graphics card and my onboard sound card is a Realtek branded one. My options may or may not be different to yours (in terms of the names etc) so do try to understand and apply accordingly. Make sure everything is all set up properly in terms of the Colossus and that at this point of time should you want to start recording your footage you can. Once all ready, let us proceed on with some system tweaking.
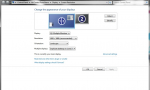
Firstly, go to your “Recording Devices†via Control Panel > Sound > Recording (tab). Right-click within the window and check to see if the “Show Disable Device†option is ticked. If it isn’t, enable that option.

What you should see are new icon(s) that are faded out. This means that they’re disabled. Anyways, what we are only concerned with is the device called “Stereo Mixâ€. It may also be called “Waveout mixâ€, “Record What You Hear†etc. Try finding the correct one (you can tell if it is incorrect if no sound is being recorded) and then enable it. After enabling it, set it as your default device and default communication device.

Right-click the device and go to Properties. Under the “Listen†tab, check the box “Listen to this deviceâ€. Within the scroll list under “Playback through this deviceâ€, select the one that refers to the Colossus.

Once that is done, apply all settings and head on to the Properties of your microphone. Same thing, under the “Listen†tab, check the option to “Listen to this device†and under “Playback through this deviceâ€, select the one that refers to the Colossus. This should be the same as whatever you have selected before for the Stereo Mix device.
To verify that sound is going into the Colossus, you will go the “Playback†tab and there should be a Colossus device. It should be named differently for ATi cards but there should be one that is supposed to be the Colossus. Try speaking into the microphone and while you’re doing that, check to see if the sound meter to the side of the Colossus device is moving accordingly. If it is, your microphone is set correctly. Now try turning on some music within your system or play some youtube videos. Check again to see if the meter is moving. It should move as well.
If it isn’t moving, you most probably had the settings done wrongly. Go back to the properties of both the microphone and the Stereo Mix device and select the right one. Keep trying until you find the correct one. Once you have it done, you are good to go. Head on to Showbiz and under audio input, select “HDMIâ€. Start recording. Try speaking into the microphone while playing some background sound (music or whatever). Stop the recording, and watch the playback video. You should be able to hear both your voice and the system audio.
Now comes the part where you will have to adjust the volumes accordingly to achieve the right balance. There are 3 things you can adjust, your microphone volume, your system volume and the playback volume of the Stereo Mix device. I will suggest you adjust in such a manner:
Make sure your speakers are of sufficient loudness to you. If you’re using a headset, adjust accordingly. Next, tweak the Stereo Mix playback loudness. To do this, head back to the Properties tab of the Stereo Mix device and under the “Levels†tab, adjust the level accordingly. At the same time, you can also adjust your microphone volume. Keep playing around with both settings till you reach the right balance.
It is perfectly fine should you adjust till both are rather soft during playback. You can always boost the audio during editing. However, once you find the right balance, simply increase both while maintaining that golden ratio. Once you are done with that, make a note of whatever settings that you have done so as to allow reference in future should you change anything.
Why and Why Not This Method?
The main advantage of this method is that you logically have a perfect sync. The main disadvantage is that you will not have individual tracks for your commentary and your footage audio. Now why exactly is this important depends solely on how you go about your editing. Also, another disadvantage (though easily overcome and should be overcome before recording) is that you have to find the right balance between your microphone and footage volume. You will not be able to adjust them during editing since they are merged into one audio file.
Conclusion
Both methods work fine. I personally prefer the second one because the syncing part is a bit tedious to me in the long run. Yes, it will take only a few seconds once you get used to it but if I can completely bypass it why not? The quality of your recording is important, but once you get passed that it is the content of your live commentary is what makes it appealing to people. I have tried a very impromptu live commentary to show you how it is done. I stutter a lot and almost have nothing to say most of the time. The audio itself isn’t very good because I was simply testing to see if it works (I used the second method for this commentary). It is my first try though and I didn’t have much preparation. Nevertheless, I hope it goes well for you and if it doesn’t, keep practising.
If you have any questions do try watching the video guide first to see if it helps. However, if you still have unanswered questions, just leave a comment here or on the video page itself and I’ll try my best to get back to you. Anyways for now you watch my really embarrassing attempt on a live commentary to what is a game with an awesome concept.